
Apple’s Maps is already on your iPhone, so why bother with Google Maps? Well, because it can do a whole host of great things Apple’s app can’t. However, these features might not be terribly obvious at a glance, and so here’s our list of top tips for Google’s excellent maps app.
Maps: Google flavoured!
Access street view
Street View’s great for checking out a location before you visit, enabling you to roam around a kind of 3D representation of wherever you’re planning on going. Accessing it’s not terribly obvious on iPhone, though. Either search for a location or tap-hold to drop a pin, and you’ll see the location bar at the foot of the screen. Tap it, then scroll upwards until you see Street View, which is opened with a tap.
In Street View mode, you can then drag to rotate or tap arrows to move along roads. Tap and use the back arrow at the top-left of the screen to exit.
Street View! It’s just like being there. Ish.
Partake in armchair tourism
Street View occasionally journeys beyond the road, enabling you to explore famous structures and locations from the safety of your iPhone’s screen. Examples include Angkor Wat, Venice and the Colorado River. A full list of Street View Treks is available on Google’s website, and most work fine in the iPhone app.

Where we’re going, we don’t need roads. (Because we’re in a temple.)
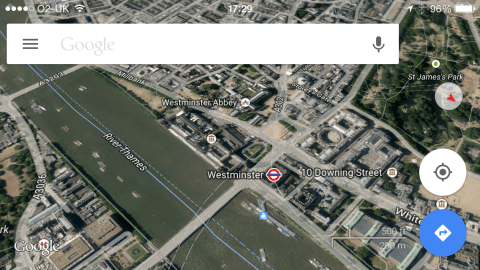
Get local information
In the main map view, tap the compass button to zero in on your location. Next, tap the hamburger button (three lines) in the search field to access the Google Maps sidebar. Tap ‘Explore nearby’. Depending on the available menus, you may be able to define a distance, type of travel and time of day (such as ’20 min drive’ and ‘evening’) and you’ll then get a list of places to eat and things to do.
Tap one to see more details. Often, you’ll find opening hours, contact details, reviews and menus. You can also swipe the blue info bar left and right to view other items from the same results list.
To explore somewhere else, tap-hold to drop a pin anywhere on the map and select ‘Explore nearby’ as before.
-
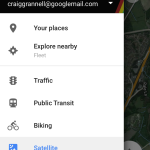
- 1. Accessing the sidebar.
-
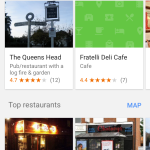
- 2. Finding things to do.
-

- 3. Checking out details.
Go one-handed with gestures
You can pan a map with a single digit by swiping, but it’s also possible to zoom with just a thumb rather than pinching/unpinching in the normal manner. To do so, double-tap but hold the second tap. Then drag up to zoom out or down to zoom in.
One-thumb zooming power!
Take maps offline
If you’re going to an unfamiliar place and don’t know whether you’ll have a data connection, save an offline map. Perform a search for where you’re going, tap the bar at the bottom of the screen, and then the ‘⋮’ button at the top-right. Tap ‘Save offline map’, then pan and zoom. Tap Save when done. Name the offline map.
To access it later, open the Google Maps sidebar, tap ‘Your places’, scroll down to ‘Offline maps’ and make a selection. Note that Google Maps will periodically ask to update your offline maps, to keep them current.
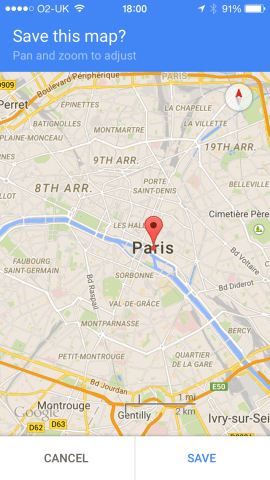
Never get lost again, even if you’ve no web connection. Well, unless your iPhone runs out of juice.
Use pins to set directions
Although you can type locations into Google Maps, in order to get directions, you can also set them using pins. Tap-hold to place your first pin, and then tap the car button. By default, Google Maps will assume you want directions from your current location to where you pinned. You can flip the two destinations using the button towards the right of the screen (the up and down arrows).
To use a pin for the second location, tap ‘Your location’, then ‘Choose on map’. Pan and zoom the map, until the cross sits over your chosen second location, and tap OK. You’ll then get directions, which you can start by tapping ‘Start navigation’.
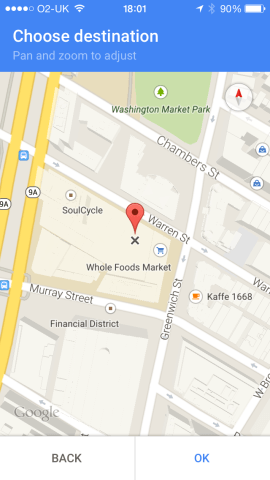
Only know vaguely where you’re going? It’s pin time!
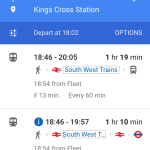
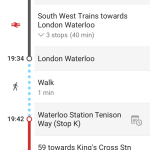
Access transit options
Apple Maps remains seemingly unconcerned with anyone not wanting to travel by car or on foot. By contrast, Google Maps provides driving, walking, cycling and transit options, accessed from the top of the screen when you input a starting point and destination.
Tap ‘Depart at’, and you can adjust the time of departure, or set it to an arrival time instead. The ‘Options’ button provides the means to define a preferred type of travel and whether you’d sooner have the best route, fewer transfers or less walking. Once you’re done, you get a straightforward travel itinerary and an estimated arrival/departure time, without having to mess about with other apps.
-
- 1. Find a route.
-
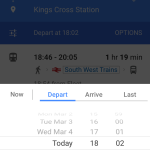
- 2. Define a time.
-
- 3. Get a journey plan.
Preview directions
Directions can be previewed, if you want to run through and check them before your journey, rather than accidentally realising you’ve driven to precisely the wrong side of the country. Once you’re looking at a route, having provided Google Maps with your start and end points (and regardless of your chosen transport type), tap the bar at the bottom of the screen. You’ll then get an overview of your journey. Tap any step to see it in the route preview, and then swipe left or right on the bar detailing the step’s information (the white one in the screen grab) to move through the various steps.
When you get to the point of firing up the full turn-by-turn directions in Google Maps (by tapping the blue button with an arrow), you can still preview future and previous steps by swiping the bar at the top of the screen.
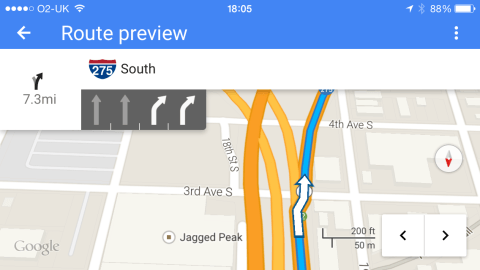
Prepare for those sneaky exits.