
Time for a spring clean?
In case you hadn’t noticed, iOS devices aren’t particularly cheap. This is one reason why Apple now banks a staggering amount of cash every fiscal quarter. It’s also the source of many complaints about the company – Apple should, argue some, release cheaper kit. This is potentially why Apple recently released the new 8 GB iPhone 5c, which is now available in a handful of territories. Some, however, argue that an 8 GB iOS device is a false economy. That amount of storage is quite limiting in this modern age of high-definition video, high-quality photographs, and more apps and games than you can shake a stick at.
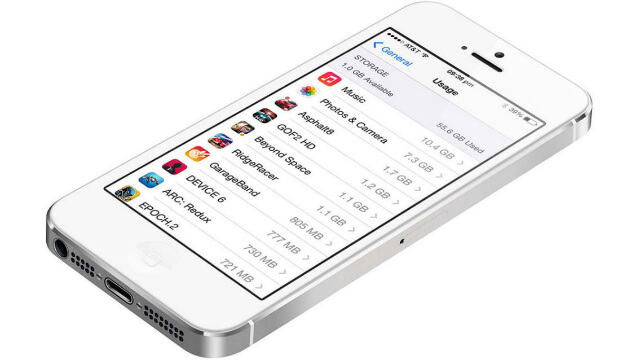
The Usage Screen shows how much data each app is using
Again, you may have an iPhone of some other specification, which is bursting at the seams, warnings flashing up every few minutes stating that the device is out of space. But, fortunately, there are quite a few things you can do to clear out the cruft and be more efficient regarding storage.
1. Examine your apps
Some apps take up a truly staggering amount of space. The worst offenders are undoubtedly games; it’s not unusual for just one to devour well over 1 GB on your iPhone. Also, the figures Apple provides in the App Store are for download sizes – when an app archive subsequently unpacks and installs, it can balloon. A particularly extreme example is one of our favorite games – Device 6, which is a 131 MB download but when installed takes up over 750 MB!
To find out which apps are taking up the most space, go to the Settings app, then General, and then Usage.
You’ll see a progress indicator whirring away, and this will (eventually – it can take several minutes) turn into a list of apps, listed by size. At the top, it’s fairly likely you’ll see Music, and Photos & Camera – at least if you have a reasonable number of music tracks and pictures stored on your device. We’ll deal with those later. Otherwise, you’ll see games and apps. Do not close this screen or even let your iPhone screen lock, or you’ll have to reload the list.
Instead, grab a pen and paper (we’re going analogue for a second) and note down large apps or games you no longer use, remember to tap your screen occasionally to keep it active.
Apps that save content like videos, books or magazines can take up a lot of space too. Tap a relevant list item to see a screen that details the app’s size and also the size of the documents and data stored within. Often, you’ll find an app is quite svelte (iBooks is 39 MB installed) but might have several GB of saved data. Note down the worst offenders. When you’re done, it’s time for the next step…
2. Save app data
Don’t go on a deletion spree just yet. First, safeguard documents and data, where relevant, because when you delete an app, any data stored within is gone for good. You can reinstall the app later (App Store, Updates, then Purchased), but it’ll be a blank copy, unless data was saved to a cloud-based source (such as iCloud or a linked Dropbox account). Therefore, before you remove an app, save or export any data or documents you want to keep.
For apps where doing so isn’t obvious or doesn’t exist, Mac/PC app iExplorer can help. To use it, connect your device to your computer and launch iExplorer. The software has a solid and functional demo mode if you don’t want to register.
From the sidebar’s Apps list, select the app from which you want to save data. On doing so, you’ll see the app’s own file system. Select the Documents and Library folders, right/Ctrl-click and export them to your computer. Generally, app data and game progress will be in Documents. Sometimes, it’ll be in Library. In either case, save these folders and you can explore them on your computer and later load the data back into a fresh install of an app by again using iExplorer. (This can be a useful way of picking up where you left off from a deleted game, rather than starting from scratch.)
3. Delete unwanted apps
Removing an app from your device is simple. Tap-hold any icon until they all jiggle, and then tap the cross at the top-left of the one you want to remove. Tap Delete and it’ll be erased from your device. (With games, you may also be asked if you want your scores removed from Game Center.)
With any apps you’re totally convinced you’ll never again use, get rid of them immediately. The space will free up within seconds. For any app or game you’re a bit unsure about removing, there’s a good system for sanity checks. Create a new folder (enter ‘jiggle mode’ and drag one app icon on to another) and name it with a future date that’s a few months away. Add to that folder all the apps you’re thinking about removing. If you use one of the apps before then, give it a reprieve by moving it elsewhere. But when the date is reached, trash any apps still lurking in the folder.
4. Prune other content
We mentioned other types of apps earlier, where the apps themselves might be small but contain loads of data. If you’ve downloaded magazine apps, the actual magazines can often be weighty, especially when they’re replicating print publications. If you’ve read all the old issues, delete them from within the app. (Most publications from Newsstand, Zinio and similar services will allow you to later download back issues if your subscription remains active, including Swipe.)
If you want a faster option for clearing a magazine app, delete it and reinstall. The fresh copy will have no data but you will have to restore your subscription.
Similarly, check inside the likes of iBooks, GoodReader and Kindle for PDFs and books you no longer need. Safari also holds a cache, if you often use Reading List; this can be deleted by selecting Safari in the aforementioned Usage list in the Settings app, tapping Edit, tapping the red button next to Offline Reading List, and then tapping Delete.
Music, photos, and video can also take up a lot of space. Check the Podcasts and Videos apps, and delete content you no longer want. If you’re regularly sent photos and videos in Messages, save those you want to keep to your Photo Roll. To do so, tap the photo within the message balloon to expand it to full-screen; tap the image and then the standard share button; select Save Image. The menu at the bottom-right of the screen provides quick access to other images you can save – essentially any already loaded into the message stream.
5. Photos and music
Synchronized photos and music are best managed using iTunes on a computer – go to the relevant tab, uncheck the content you no longer want on your iPhone and sync. However, you can make on-device edits. Your entire music collection can be removed by selecting Music in the Usage list, and then by following the same deletion procedure as per Safari’s Reading List. With the Photos app, zoom into the Moments view, tap Select and choose batches of pictures by tapping the smaller Select buttons. These can then be removed by tapping the trash icon.
Note that we recommend you download photos to your computer prior to deleting anything. See Apple’s support document for further details.
With videos shot using the Camera app, also download them to your computer and delete them from your device. If you use third-party video and photo apps, check to see if they retain local copies of your files and delete those that you have a copy of elsewhere.
6. Embrace streaming
With films, TV shows, and music, consider streaming services instead of syncing/downloading content to your iPhone. Spotify, Netflix and the like can be good alternatives to having music and videos on your iPhone (and better than Apple’s iCloud solutions, in that they stream to your device rather than forcing you to download content when you want to play it). We certainly wouldn’t recommend splashing out for such a service over buying an iPhone with more storage (a year of Spotify alone costs more than the next most expensive iPhone), but they’re a no-brainer if you’re interested in one of them or already subscribe and use them elsewhere.
A cheaper solution for media streaming is to use your own Mac or PC and an app. Air Video HD comes in two parts. On your computer, you install a server and point it at certain folders on your hard drive. On the iOS device, a client app live-streams video from your computer, and re-encodes the footage if it needs to.
The similar StreamToMe also supports streaming music. Neither app will work with protected content bought from the iTunes Store, but they support a huge range of other video formats, and StreamToMe will work with DRM-free audio. Both apps also support streaming over 3G, meaning you can potentially access your content from anywhere you’ve a data connection (although do be mindful of data charges if you don’t have an unlimited deal with your provider). It’s a great way to access many hundreds of GB of media on your iPhone, without having to sync anything.
So there you have it, space: the final frontier. Even with the most packed iPhone, you are now armed with enough tips to eke out a little more space, or – if you’re in the mood – perhaps even free up several GB more on your trusty device.