
Live Listen, an accessibility feature for Apple’s wireless earphones, offers a number of interesting use cases.
Folks could turn their AirPods into pseudo-hearing aids, using their iPhone’s microphone to funnel noise to their wireless earbuds. If you’re the lazy type, you could also enjoy having a conversation without having to take your AirPods out or pause your music. Live Listen also lets users “bug” a room to surreptitiously listen in on conversations – not that we condone such behavior.
Of course, the recent AirPods Pro offer a similar feature using their “transparent” noise-canceling technology – but it’s not exactly the same thing, and older Airpods models aren’t compatible with transparency. So if you have an older set of pods, we’ve got you covered.
Whatever the use case, we can certainly show you how it works.
Configuring Live Listen
To get Live Listen up and running on your handset, you’ll of course need a pair of AirPods. Connect these to your device beforehand, then launch the Settings app, tap Control Center, and choose Customize Controls. This interface lets users choose exactly what they’d like to appear in Control Center on their iPhone or iPad – it’s a cool hidden menu, and if you haven’t visited it before, you might like to prune out some of Control Center’s default additions.
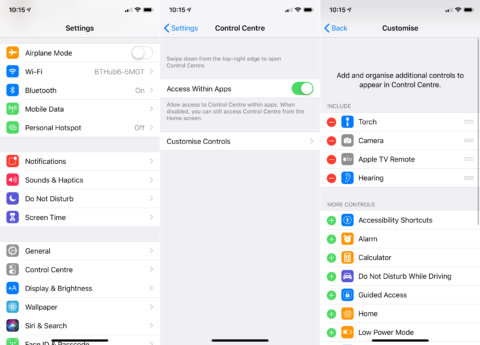
Customizing Control Center is a great hidden feature in iOS — just make sure you add Hearing to the Included list
For Live Listen, however, you need to tap the “+” icon next to Hearing so it appears under the Included list at the top of the screen. Then, leave the Settings app and put your AirPods in.
Using Live Listen
Using Live Listen is simple. Once your AirPods are in your ears and you’ve heard the familiar chime signaling that they’re hooked up successfully, swipe down from the top-right corner of your screen to reveal Control Center. (Or swipe up from the bottom on older devices). Here, you should notice a new icon: an ear.
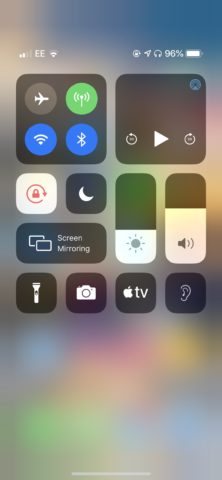
The Hearing icon should appear in the bottom-right corner of Control Center, though if you’ve been customizing, its position could be slightly different.
Tap this, and the Live Listen pop-up interface should appear on-screen. You should also notice that your AirPods are now picking up noise detected by your iPhone’s microphone. The clarity is really quite good, with the volume not being unbearably loud or too quiet to hear.
The interesting thing with Live Listen is that because your iPhone picks up the source of the noise, you can position it in different places to listen in on different things. This could be another person’s conversation (you wouldn’t do that, would you?), a TV or radio set in a different room, or even your front door if you’re waiting for the tap of a delivery.
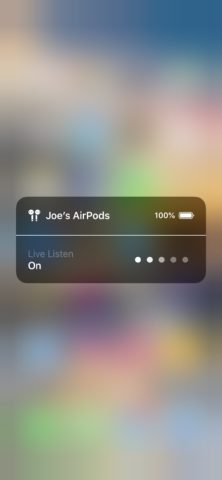
The Live Listen pop-up interface lets you know that your AirPods are connected, and even gives you an indication of the volume of incoming sound.
The feature is so easy to activate that you could switch Live Listen on to partake in a conversation without taking out your AirPods. Or of course, you might find that the feature’s intended use suits you best, and that, if you’re somewhat hard of hearing, Live Listen makes it easier for you to tune into conversations and to block out ambient noise. In this respect, Live Listen is particularly useful when talking in an echoey location – you’ll find that all the reverberations are blocked out, making it easier to hear what people in your conversation are saying.
Don’t forget that Live Listen requires a pair of AirPods, and you’ll need to be running iOS 12 — the latest major release of iOS. You can update your iPhone from the Settings app.