
There are all kinds of ways to share photos – but be wary of using overly public options
Even though the number of photographs being taken has exploded now we’re squarely in the realm of digital, that doesn’t mean snaps are any less cherished. After all, even though you can take an almost unlimited number of pictures with your iPhone (rather than saving that very last shot on a roll of film for an opportune moment that never comes), this just means you have more great stuff to choose from.
Assuming you’re not spending the holidays solely taking selfies – mouth full of turkey and a silly hat on your head – chances are you’re going to want to share photos with other people. There are various ways to do so. Here are our five favorites – four of which need nothing more than your iPhone, free apps, and an internet connection.
Share photos with iCloud
Naturally, Apple provides you with the means to share snaps right from within the Photos app. In the Albums tab, tap +, and create a new shared album. In the Photos tab, you can use + to add pictures from elsewhere. In People, you can decide who’s going to have access to the album.
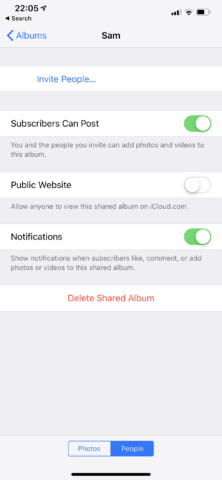
In fact, that second tab does a whole lot more, also enabling you to allow subscribers to post their own shots to the album, and defining whether or not your images become available online as a public website.
If you opt for the latter, be aware your images will technically be available for anyone to see. However, these albums are rather nice, with slideshow functionality that looks pretty amazing on large displays. Still, keeping things private also works well, given that the Photos interface is good for flicking through pics, downloading your favorites to keep for good, and making the odd comment – although it’s of course limited only to people who are using an iOS device.
Set up a Dropbox album
If you want to share your photos more widely, don’t especially want to pay for the privilege, and aren’t too fussed about sitting them all on a publicly accessible (albeit obfuscated and semi-randomized) link, Dropbox is a good bet. The app by default gives you 2GB of storage entirely for free, and makes it pretty easy to create shared folders full of images.
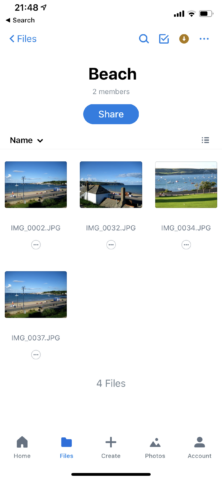
Once you’ve installed the app, head to Apple’s Files, tap Location, then Edit, and ensure Dropbox is switched on. Then back in the Dropbox app, tap + and Create Folder. Tap … on the folder itself, and then Share. You can create a link so people can access the folder, or invite them to edit it, so they can add their own images.
Finally, you need to upload some photos. In Apple’s Photos app, select what you’d like to share, tap the share button, and then Save to Files. Select Dropbox, locate and tap your folder, and tap Add. Your images will be uploaded. Invited people can browse them in-app on mobile devices, or access the album in a web browser if they don’t have Dropbox installed.
Go private on Facebook
Most people have a Facebook account, and so sharing your photos there may seem like a smart move. The trick is – unless you want to make your snaps very public – locking down your album, so it’s kept relatively private.

In the Facebook app, go to your profile page, tap Photos, and then Albums. Tap Create Album, and you’ll get a range of privacy options. Public means anyone can see the album (best avoided), or you can decide to include all friends, everyone except specific friends, or a user-defined list. The last of those options is the best choice.
When the album’s live, tap the … button to edit it. You can then add contributors who can upload photos, put up a cover image to make the album a bit more flashy, and wait for loads of lovely comments – or a slew of people lazily just clicking ‘Like’ before moving on. Still, Facebook’s familiar interface does feel friendly, and it can be a nice way to interact with photos – not least for people who are a long way from home.
Get creative with Pic Collage
When you want to celebrate an event with more than just a bunch of photos hurled on to the internet, try Pic Collage. As its name suggests, this is an app that enables you to create collages. You can go entirely free-form if you like, but we reckon the best bit of the app is its extensive collection of grid layouts.
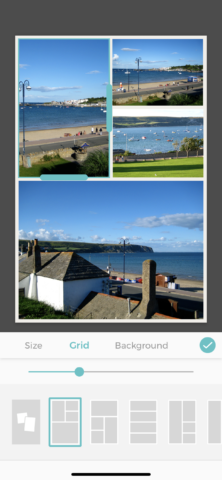
To get started, select several photos, and you’ll then be presented with relevant layouts. Pick one, and Pic Collage does all the hard work, putting your photos into place. Everything remains editable. You can change layouts (although that will of course obliterate any edits made up to that point), but also adjust almost every aspect of your existing collage.
This means you can amend backgrounds and border sizes. Double-tap an image to experiment with effects, fill types, and image cutouts. Still not satisfied all those creative urges? Try the stickers, text and doodling tools, and animation options. When you’re done, you can share your masterpiece, and save it to your library. Note that exports have a small watermark, although a one-off $2/£2 IAP removes those from the app for good.
Go old-school and print stuff out
Although you might be fully immersed in the digital world, there’s still something to be said for physical objects. If you’ve got a great photo of a friend or family member, which could remind them of a precious moment, why confine it to screens and phones?
These days, it’s almost trivially easy to get photos printed, either at a local store, or by using one of the many online services that will mail you prints in the post. And if you fancy something a bit special, you can have a favorite snap reworked as a beautiful canvas that someone can hang on the wall. Even the most well-considered shared digital album in the world isn’t going to beat that – but the process still starts with your iPhone!