
In this series, we dig into an app we think you should be using and explain what it is, why it’s great, and how to get started. This time, we’re covering pro camera app Halide.

What is Halide?
A pro camera for everyone. It puts professional tools in your hands and makes them simple enough for anyone to use – from enthusiastic amateurs to jobbing photographers.
What makes Halide great?
That it makes good on its promises. The app is straightforward to get started with, but powerful enough when you need to go deeper. It’s also been created by photography enthusiasts, which comes through in everything from the interface to the feature set.
How can I get started with Halide?
Take some photos: Launch Halide, give it permissions it asks for, and you’ll see a familiar camera interface. Tap within the large Viewfinder area to set a point of focus. Drag up and down to change exposure. Tap the shutter button to shoot an image. Easy!
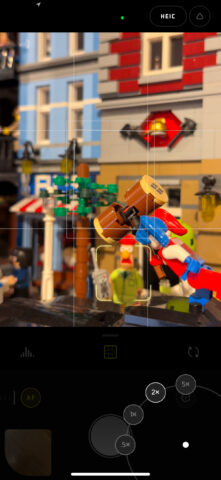
Switch cameras: Tap the ‘1x’ button to cycle through your iPhone’s cameras, or tap-hold to view them all and select one. Want to shoot a selfie? Tap the button with two curved arrows that sits in the Quickbar that’s underneath the Viewfinder.

Try manual focus: Tap the ‘AF’ button to enter manual focus mode. Adjust focus by dragging the dial, using the Focus Loupe magnifier for precision. Tap the Focus Peaking button (a circle with three small gaps) to have any sharp edges detected in the Viewfinder marked green. Tap ‘AF’ again to revert to autofocus.
Adjust white balance: Automatic white balance can lead to captures that don’t resemble the scene before you. If that happens, drag up the Quickbar to expand it, tap ‘AWB’ and choose an alternate option: cloudy, daylight, fluorescent, or tungsten.

Level your shots: Tap the grid in the Quickbar to bring up an on-screen grid for better orienting your captures. When your iPhone is level, the central rectangle turns yellow and you get a haptic nudge. In top-down captures, you instead align two circles.
Adjust processing: During first launch, Halide asks how you’d like images processed. Adjust your choice using the menu at the top of the screen. Process Zero disables Apple’s processing, resulting in more natural shots. Both Process Zero and Apple ProRAW capture images with more information then Apple’s default format (HEIC). This can be useful for fine-tuning in a RAW-compatible image editor, although note that these formats do create larger file sizes.

Go full manual: Tap the button at the top-right of the display and then Manual to switch to full manual mode. Then adjust shutter speed and ISO with, respectively, vertical and horizontal swipes on the Viewfinder. For long shutter speeds, use a tripod. Lower ISO values mean more light is required to expose an image, but you’ll get less noise. Experiment for best results.
Customise your setup: Expand the Quickbar, tap-hold any item and then choose ‘Arrange Toolbar’. Drag and drop buttons (including Settings and Timer) to suit. In Apple’s Settings app, go to Camera > Camera Control and you can have it launch Halide rather than Camera. You can also add Halide to your Lock Screen and Control Center.

Explore your photos: Tap the image at the bottom-left of the screen to enter Halide’s Reviewer. Within, you can view any image’s metadata. Play Live Photos by tapping the button at the top right. For RAW images, tap DNG and use +/- to adjust brightness settings, which can bring life to gloomy shots.
Use other devices: Although primarily designed for iPhone, Halide offers a bespoke iPad experience geared to the larger display of Apple’s tablet. There’s also a companion Apple Watch app, which acts as a combined remote and live preview of what your iPhone can see.
Visit the Halide website or get Halide (free + $2.99/£2.49 per month) from the App Store. Visit the Halide support page to sign up for a 10-day email course or read the full manual.