

If you’re planning on taking advantage of the warm weather to finally complete that garden redesign you’ve been putting off, then don’t forget your iPhone or iPad — because it can really help. Here’s how you can plan yourself a brand new garden using nothing more than your smartphone and an app called Home Outside.
You can pick up Home Outside for $3 (£3) on the App Store. It might not look like much: as of this writing, the app isn’t optimized for the iPhone Xr, X, or XS, and the iPad version looks like a blown-up incarnation of the iPhone app — it won’t operate in landscape and certainly isn’t optimized for the newer iPad Pro models. Despite these minor shortcomings, however, Home Outside offers a great environment for planning your new garden design and experimenting with different ideas.
Setting up your space
When you’re presented with a blank canvas in Home Outside, the first thing you should do is set up your space. Hit the cog icon in the top-right corner and decide on an appropriate background color and grid size. You can also choose between a light and dark mode, meters or feet, and whether a grid and ruler appear on-screen. After all that, you’ll be ready to go.
Setting up your space.
Landscaping your redesign
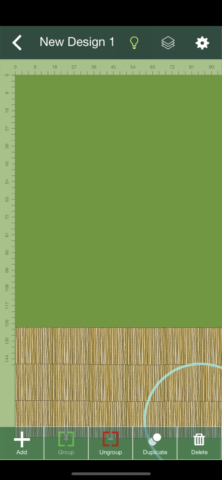
Home Outside lets users design at the hardcore level of landscaping, as well as prettifying your creation after the hard graft is done. Before choosing between perennials, annuals, climbers, or shrubs, get the real bedrock of your redesign figured out. To do this, tap the “+” icon in the bottom-right of the screen and choose the “Hardscape” menu: here, you can add patios, paths, walls, and stones to your garden. Garden design is just like pizza-making — if you get the base right, the rest will naturally follow.
At first, adding items in Home Outside might seem pretty laborious. Creating a patio or wall, for instance, practically requires you to add brick by boring brick. To speed things up, throw down three or four virtual slabs, tap one, group all four together, and then hit “duplicate.” Four become eight, then twelve, and before you know it your patio will be done and dusted.

Building your design.
Don’t forget to take advantage of the sketch and text tools to annotate your garden design as you go. There’s also a handy undo button for when things go wrong.
Furnishings, plants, and structures
Home Outside offers a wide range of objects which you can manoeuvre and place in your virtual garden, including furnishings and structures (like sheds and greenhouses). As you’d expect, you can add plants in, too: default icons for shrubs, blossom, trees, and even ornamental grasses are available to choose from. Of course, you can pinch-to-resize items, spin them, and pick them up and move then wherever you like. The best thing about Home Outside is that it lets you experiment with multiple redesigns right from the comfort of your armchair.
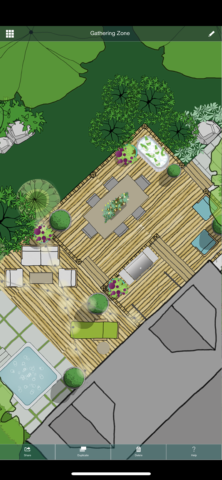
Design a fully-furnished garden.
Pro tips
If you want to go pro with Home Outside, consider using layers to separate the stages of your redesign. One layer for foundations (like paths and lawn), another for structures, and a final one for plants might be a smart way to go. Don’t forget that you can share designs from inside the Home Outside app, too.
So, don’t let summer pass you by without breaking ground on your next garden project. You can pick up the all-important Home Outside iOS app for on the App Store.